FAQ


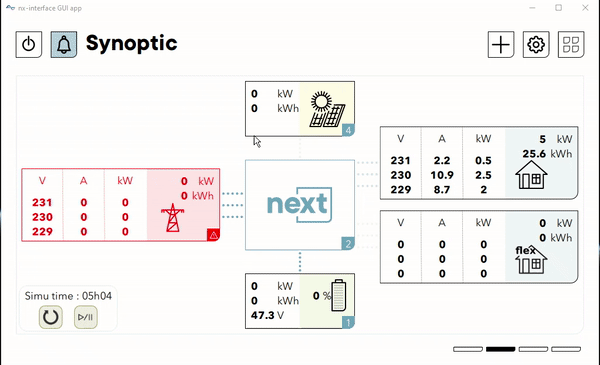
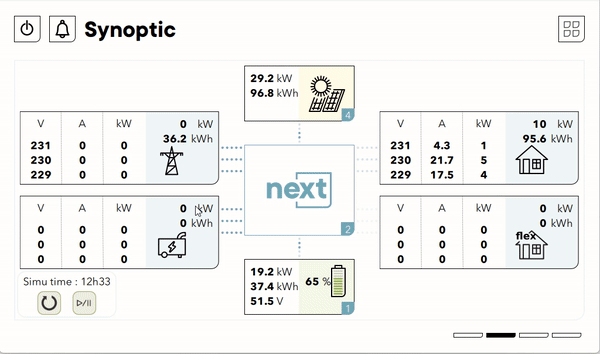
next
next
xtender
systèmes d'énergie hybrides avec xts, xtm ou xth, de 1kW à 24kW en monophasé ou en triphasé de 3 à 72kW avec un puissant commutateur de transfert. Maximisez l'énergie générée par le générateur solaire en utilisant le régulateur de charge solaire MPPT variotrack ou variostring. Ces deux modèles sont le bon choix pour un système solaire hybride cohérent avec jusqu'à 15 unités en parallèle, parfaitement synchronisées avec l'xtender .

The system stores by default a daily logfile on the SD card of the RCC and/or Xcom device. However, in order to have a complete system backup, including the logfiles, the current configuration parameters and the system messages, the function "Save all files (system backup)" should be used. Please go to RCC settings and follow the next steps:

The following items will be stored in the SD card:
- Events log
- RCC-02 Console parameters
- xtender, variotrack, variostring, BSP parameters
ATTENTION: Please bear in mind that this function with a 9 Xtender system could take up to 15 minutes
Once the backup is finished, please take out the SD card from the RCC-02 console. Then you could copy all the folders and files in the SD card using a computer.
Please insert again the SD card in the RCC-02 console when the process is finalized.
The latest software version, Xtender System Update (RXXX) is always available on our Studer website in the Software and Updates section.
A software upgrade may be necessary during system commissioning, when adding a device to an existing system, after a device has been serviced, or to take advantage of a new function or parameter. When in doubt, contact Studer Innotec before performing the software update.
When you download the latest software release, you will have in the computer a zip folder containing:

Please copy the 02 Folder into the SD card of your RCC or Xcom device and insert the card in the device.
Please read carefully the Updating procedure (PDF) before performing the update.
RCC
The RCC will beep when the SD card is correctly inserted. Then confirm the update by pressing ok. The update is completed when the RCC displays the message "The update is finished" (051).
Xcom
The Xcom will blink red when the SD is inserted. The update will start automatically. The update is completed when the LED indicator is green.
ATTENTION: The updating procedure can take between 3 and 30 minutes. During this time, it is normal that the devices make audible signals.
The update should be performed in all the RCC and Xcom devices in the system (all the devices having an SD or microSD card). All the Studer products in a system should have the same software version.
The latest software version is always available on our Studer website in the Software and Updates section.
A software reset may be necessary in case of errors or problems in the system, in order to restore the factory settings and update all the devices in the system with the same software version.
When you download the latest software release, you will have in the computer a zip folder containing:

Please modify the name of the folder 02 to 03. Then copy the 03 Folder into the SD card of your RCC or Xcom device and insert the card in the device.
The process will be then similar to the process described in the FAQ Software Update.
Please read carefully the Updating procedure (PDF) before performing the reset.
RCC
The RCC will beep when the SD card is correctly inserted. Then confirm the update by pressing ok. The update is completed when the RCC displays the message "The update is finished" (051).
Xcom
The Xcom will blink red when the SD card is correctly inserted. The update will start automatically. The update is completed when the LED indicator is green.
ATTENTION: The software reset will delete all the previous system configurations. After the reset, please make sure that the required and critical configurations are performed before turning on the system.
The update should be performed on all the RCC and Xcom devices in the system (all the devices having an SD or microSD card). All Studer products in a system should have the same software version.
For grid connected systems, adding battery storage provides a back-up energy source in the case of grid failure. The Studer standard application maintains the battery fully charged and supplies loads using solar and grid energy. If grid injection is authorized, excess solar energy is exported to the grid. Otherwise, with standard settings, excess solar energy is not used.
With the self-consumption application, the Xtender system allows the battery to be discharged at night in order to store excess solar energy during the day, and thus increase the amount of solar energy consumed onsite.

The following options are available for configuring the self-consumption in your Xtender system:
1) Battery priority function
By activating this function (1296) there is a battery priority voltage (1297) as reference and the behaviour of the Xtender will be different if the battery voltage is above or below this level:
- Battery voltage above battery priority voltage
-
- The battery will be charged only with energy coming from Variotrack/Variostring (solar) and not from the grid.
- The AC-in input limit will be automatically reduced from the value set by the user (1107) to a minimum of 1Amp
- Battery voltage below battery priority voltage
-
- The battery will be charged from both Variotrack/Variostring (solar) and from the grid (AC-in).
- The AC-in input limit remains fixed at the value set by the user (1107)

Advantages:
- The grid is always available to support in case of peak of demand on AC-out
- The Xtender is always at transfer/boost/charger function. There is no transition from one function to another
Disadvantages:
- There is always a minimum of 1 Amp consumed from the grid. It is not possible to reach 0 consumption from the grid.
- There is some excess of solar energy that will be not used
2) Grid as generator function
In this case we use the grid as if it was a generator. The Xtender will be off-grid as soon as the battery level is good (according to battery voltage). When the battery voltage reach a certain level (1247, 1250, 1253), the Auxiliary Contact 1 from Xtender will be activated. The Remote Entry will be automatically activated according to Auxiliar 1 status. The Remote Entry will allow the connection to grid by disabling the transfer relay prohibition (1538).
Once the battery is charged and the battery voltage reaches the deactivation voltage (1255), the Auxiliary 1 will be deactivated, deactivating the Remote Entry and therefore forbidding the transfer relay again. The Xtender is again off-grid with 0 consumption from the grid.

Advantages:
- The self-consumption of solar energy is maximized in comparison to the first option.
- When the Xtender is off-grid the consumption from the grid is 0.
Disadvantages:
- There is a micro-shutdown (max. 15ms) during the transition from grid connected to off-grid.
- In case of peak of demand in off-grid mode, the Xtender will not have support from the grid and risk of overload is higher.
Self-consumption with Lithium Batteries (xcom-can)
Additionally, when the Xtender works with Lithium batteries that are communicating through the Xcom-CAN bridge, the self-consumption could be easily configured thanks to the "SOC for backup" parameter {6062}, by default set to 20%.
AC Coupling is a term used to describe systems that combine grid-tie inverters (usually feeding all energy produced to the grid) and battery-based inverters (usually for off-grid or backup applications).
Grid-tie inverters or solar inverters convert the variable direct current (DC) output of a photovoltaic (PV) solar panels into a utility frequency alternating current (AC) that can be fed into a commercial electrical grid or be used by a local, off-grid electrical network. A grid-tie inverter synchronizes with an existing sine wave (grid) and shuts down upon a grid failure.

Today many manufacturers have included "frequency shift" behaviour on their grid-tie inverters. This allows the grid-tie inverters to reduce their power output depending on the grid frequency.

One or various solar grid-tie inverters can be installed in an Xtender system, coupled on AC. The system will work as described below:
1) AC Coupling with a Xtender Off-grid system
When off-grid, the Xtender is forming the grid with energy from the battery, using the inverter function. In this case, a solar inverter can be connected on the AC output of the Xtender. It will synchronize with the grid created by the Xtender and will feed its solar production into the grid to supply the loads and charge the battery.

When there is an excess of solar production and the batteries are full, the system will need to limit the solar production. We can use the frequency control function from the Xtender, that will increase the frequency of the AC output according to the battery voltage. When the battery is fully charged, the solar inverter will stop its production, thus both the battery and the system are perfectly secured.
The frequency control function is activated by setting the parameter {1549} "Inverter frequency increase according to battery voltage" to YES.
2) AC Coupling with an Xtender connected to the grid
When connected to the grid, the Xtender will synchronize with it and close the transfer relay. In this case the Xtender acts as a current source inverter. Both the voltage and frequency are set by the grid and the Xtender synchronizes with them and exchange current.

The solar inverter connected in the system, will feed solar energy that will be used directly by the loads and to charge the battery through the Xtender. In this case, the Xtender can't do any frequency control (the grid is controlling the frequency), therefore, the excess of solar production from the solar inverter will be then fed into the grid.
3) AC Coupling with an Xtender connected to a generator
Similarly, as when the Xtender is connected to the grid, the Xtender connected to a generator will synchronize with it and close the transfer relay. Again, both the voltage and frequency are set by the grid and the Xtender synchronizes with them and exchange current.

The main limitation of this situation is that it is not possible to feed energy back to the generator, as it will damage the machine. For safety reasons, it is recommended to use the Xtender's Auxiliary contact to open a circuit-breaker isolating the solar inverter from the Xtender inverter when the generator is working. During times when the generator is not used, the system will work as described in the off-grid situation (1).
AC Coupling with Lithium batteries
To enable control of a solar inverter connected on AC-Out with frequency shifting by the Xtender in off-grid mode, parameter {6072} must be set to “Yes”. This gives access to two sub-parameters:
- the first {6073} defines the frequency delta from the user frequency (e.g. 50Hz) at which the power derating of the solar inverter begins,
- the second {6074} defines the frequency delta from the user frequency at which the power derating of the solar inverter reach 100%.
The frequency shifting is performed according to the maximum charging current allowed by the Lithium battery.


{6073} has a default value of 1.0 Hz, which makes the frequency to start derating equals to 51 Hz.
{6074} has a default value of 2.7 Hz, which makes the frequency to reach 100% derating equals to 52.7 Hz.
A third parameter {6086} allows to prioritize the ac-coupling instead of the solar charger energy in off-grid mode only. When the ac-coupling produces enough energy to match the battery required charging current, the solar chargers stops producing and only the solar inverter is regulated.
There are two communication solutions available for your Xtender system to communicate with the Studer Portal. The interface allows for remote interaction with the installation exactly as if on-site with the remote control RCC-02/-03, including:

These solutions are:
· Xcom-GSM
This system includes a 3G Modem to insert your local SIM card with data package for GPRS or 3G internet connection.
· Xcom-LAN
This system includes a LAN Modem to connect with your LAN router for internet connection.
To use 4G or Satellite connection, the Xcom-LAN allows to connect a 4G Modem or Satellite Modem for the internet connection, instead of the LAN router. The 4G or Satellite modem are not provided by Studer Innotec.

In a grid-connected system, it is possible to feed excess solar energy into the grid, if grid injection is authorized. Please confirm with the local regulation and utility directives if grid feeding is allowed in your country and for your specific situation.
Be careful with the grid-feeding function. Always respect the rules in force prescribed by your utility. Grid feeding with inverters connected to batteries is forbidden in some countries. There is no ENS function or any other similar function linked with the grid feeding function of Xtender. You can add an external ENS detector.
There are two possible configurations for the grid feeding function:
1) Standard grid feeding
In this configuration, the system will inject excess energy from the solar system to the grid. The solar energy is used first to supply loads and charge the battery. Additional energy is injected to the grid, only when the battery is in absorption or floating phase.

*The maximum current of the source is respected {1107} (Input limit).
2) Forced grid feeding
With the forced grid feeding it is possible to discharge the batteries towards the grid during a given time frame. Thus, between the start time {1525} and the stop time {1526}, the Xtender will feed current from the batteries to the grid, discharging the batteries up to {1524} Battery voltage target for forced grid feeding.

*To be adjusted to the desired value.
Grid feeding regulation
The grid feeding function will apply the frequency control strategy, reducing linearly the feeding current when the frequency is above the nominal frequency of the inverter. In addition, this function has a protection for limiting the power when the grid voltage is too high.
Please check our RCC manual for further description on the configuration of this limit and control.
Grid feeding with AC Coupling
The grid feeding function from the Xtender is only related to the energy fed into the grid by the Xtender from the DC side (battery). In a system with a solar inverter coupled in AC, the grid function from the Xtender does not control or limit the energy fed into the grid by the solar inverter. For this, an external controller will be required.
There is an electrical supply configuration called bi-phase. It is made of a common neutral and two phases of 120V but with phase shift of 120 degrees. There is a total voltage of 208V between the two phases that can be used to supply 208V loads.

This system is done with 2 Xtenders 120V to have a 208V at the output. To the AC-input a biphase system must be applied. They are wired as follow:

In order to complete the configuration. You must
- Adjust Phase Selection Jumper in each Xtender:
-
- Xtender 1: L1
- Xtender 2: L2 (L2 with 120 degrees phaseshift)
- Adjust parameters with RCC:
-
- “Inverter frequency” {1112}: 60Hz
- 3-phase integral mode {1283}. NO. If this parameter is enable, the system is checking for a 3-phase system and if a phase is missing, then the system does not work.
Sharing an installation allow you, your customer or your installer remote checking visualize if the installation is running well. To share it, go to your installation and follow the steps:
There is a wide range of battery technologies available for energy storage applications. Studer devices are compatible with all battery types, including lithium batteries. While with the other battery types, adapting the configuration of the battery management cycle to the battery specifications is enough, with lithium batteries the communication plays a key role. Lithium batteries differentiate from other batteries by having an integrated Battery Management System (BMS).
https://support.studer-innotec.com/battery-compatibility
There are two types of Lithium batteries:
1) Lithium batteries with communication
Most lithium batteries require communication between their BMS and the rest of the system for an optimal management of the battery (safety and lifetime). Every battery has its own specific protocol to communicate. The Xcom-CAN works as a bridge between the BMS and the Studer bus. It has several protocols implemented for Lithium battery management, which are compatible with a list of specific batteries.

When connected to an Xcom-CAN, the BMS takes over the control of the battery management, which is no longer available in the Xtender, Variotrack or Variostrings settings menu. The battery management information is sent from the BMS to the Xcom-CAN, which will steer the Studer devices adjusting their configuration accordingly.
Having a communicating BMS makes the system smart, enabling us to facilitate the configuration of the main functionalities of the system with a list of parameters unique for lithium batteries.
The configuration of an Xtender system with lithium batteries and an Xcom-CAN can be easily done using the following parameters: SOC for backup {6062} and SOC for grid feeding {6063}

2) Lithium batteries without communication
Some lithium batteries with an integrated BMS do not need communication. These batteries will require a configuration of the battery management cycle as requested by the battery manufacturer. Our configuration assistant can guide you through this configuration. Selecting Lithium as battery type and choosing the right capacity is usually enough.

Please confirm with the battery manufacturer that these settings are suitable for your lithium battery. The battery management settings can be adjusted according to battery manufacturer specifications in the Xtender settings menu on your RCC.
XTENDER INVERTER CHARGER
|
1137 |
BATTERY MANAGEMENT AND CYCLE |
DEFAULT (24Vdc) |
VALUE |
Example |
|
1138 |
Battery charge current |
60 |
ASK BM |
50A |
|
1139 |
Temperature compensation |
-3 |
ASK BM |
0 |
|
1568 |
Undervoltage |
|
|
|
|
1108 |
Battery undervoltage level without load |
23.2 |
ASK BM |
22Vdc |
|
1109 |
Battery undervoltage level at full load |
21 |
ASK BM |
22Vdc |
|
1110 |
Restart voltage after batteries undervoltage |
24 |
ASK BM |
25Vdc |
|
1121 |
Battery overvoltage level |
34.1 |
ASK BM |
27Vdc |
|
1122 |
Restart voltage level after an battery overvoltage |
32.4 |
ASK BM |
|
|
1140 |
Floating voltage |
27.2 |
ASK BM |
26,5Vdc |
|
1141 |
New cycle menu |
|
|
|
|
1143 |
Voltage level 1 to start a new cycle |
25 |
ASK BM |
26Vdc |
|
1144 |
Time period under voltage level 1 to start a new cycle |
30 |
ASK BM |
2 min |
|
1451 |
Absorption phase |
|
|
|
|
1155 |
Absorption phase allowed |
Yes |
Yes |
Yes |
|
1156 |
Absorption voltage |
28.8 |
ASK BM |
26,5Vdc |
|
1157 |
Absorption duration |
2 |
ASK BM |
1h |
|
1158 |
End of absorption triggered with current |
No |
Yes |
Yes |
|
1159 |
Current limit to quit the absorption phase |
4 |
ASK BM |
3A |
Auxiliary contact 1
according to battery voltage: in case you are using Auxiliary Contact 1 to active some function or generator, values must be adjusted.
|
1201 |
AUXILIARY CONTACT 1 |
DEFAULT (24Vdc) |
VALUE |
|
1245 |
Contact active according to battery voltage (AUX 1) |
|
|
|
1288 |
Use dynamic compensation of battery level (AUX 1) |
No |
No |
|
1246 |
Battery voltage 1 activate (AUX 1) |
Yes |
Yes |
|
1247 |
Battery voltage 1 (AUX 1) |
23.4 |
Enter value |
|
1248 |
Delay 1 (AUX 1) |
1min |
Enter value |
|
1249 |
Battery voltage 2 activate (AUX 1) |
Yes |
No |
|
1250 |
Battery voltage 2 (AUX 1) |
23.9 |
N/A |
|
1251 |
Delay 2 (AUX 1) |
10 |
N/A |
|
1252 |
Battery voltage 3 activate (AUX 1) |
Yes |
No |
|
1253 |
Battery voltage 3 (AUX 1) |
24.2 |
N/A |
|
1254 |
Delay 3 (AUX 1) |
60 |
N/A |
|
1255 |
Battery voltage to deactivate (AUX 1) |
27 |
No |
|
1256 |
Delay to deactivate (AUX 1) |
60 |
5min |
|
1516 |
Deactivate if battery in floating phase (AUX 1) |
Yes |
No |
VARIOTRACK SOLAR CHARGER
|
10003 |
BATTERY MANAGEMENT AND CYCLE |
DEFAULT (24Vdc) |
VALUE |
Example |
|
10037 |
Synchronisation battery cycle with Xtender |
Yes |
Set Value |
No |
|
10002 |
Battery charge current |
80 |
Set Value |
80Adc |
|
10334 |
Battery undervoltage |
20 |
ASK BM |
20Vdc |
|
10036 |
Temperature compensation |
-3 |
ASK BM |
0 |
|
10004 |
Floating phase |
|
|
|
|
10005 |
Floating voltage |
27.2 |
ASK BM |
26.5Vdc |
|
10007 |
Absorption phase |
|
|
|
|
10008 |
Absorption phase allowed |
Yes |
Yes |
Yes |
|
10009 |
Absorption voltage |
28.8 |
ASK BM |
26.5Vdc |
|
10011 |
Absorption duration |
120 |
ASK BM |
60 min |
|
10012 |
End of absorption triggered by the current |
No |
Yes |
Yes |
|
10013 |
Current threshold to end absorption phase |
10 |
ASK BM |
3A |
|
10028 |
New cycle |
|
|
|
|
10030 |
Voltage level 1 to start a new cycle |
24.4 |
ASK BM |
26Vdc |
|
10031 |
Time period under voltage level 1 to start a new cycle |
30 |
ASK BM |
2 min |
|
10085 |
Battery overvoltage level |
34.1 |
ASK BM |
26.8Vdc |
|
10086 |
Restart voltage level after a battery overvoltage |
32.4 |
ASK BM |
26,5Vdc |
VARIOSTRING SOLAR CHARGER
|
14003 |
BATTERY MANAGEMENT AND CYCLE |
DEFAULT (24Vdc) |
VALUE |
Example |
|
14036 |
Synchronisation battery cycle with Xtender |
Yes |
Set Value |
No |
|
14001 |
Battery charge current (VS-120) |
120 |
Set Value |
120A |
|
14217 |
Battery charge current (VS-70) |
70 |
Set Value |
70A |
|
14216 |
Battery undervoltage |
20 |
ASK BM |
20Vdc |
|
14035 |
Temperature compensation |
-3 |
ASK BM |
0 |
|
14004 |
Floating phase |
|
|
|
|
14005 |
Floating voltage |
27.2 |
ASK BM |
26.5Vdc |
|
14007 |
Absorption phase |
|
|
|
|
14008 |
Absorption phase allowed |
Yes |
Yes |
Yes |
|
14009 |
Absorption voltage |
28.8 |
ASK BM |
26.5Vdc |
|
14011 |
Absorption duration |
120 |
ASK BM |
60 min |
|
14012 |
End of absorption triggered by the current |
No |
Yes |
Yes |
|
14013 |
Current threshold to end absorption phase |
10 |
ASK BM |
3A |
|
14027 |
New cycle |
|
|
|
|
14029 |
Voltage level 1 to start a new cycle |
24.4 |
ASK BM |
26Vdc |
|
14030 |
Time period under voltage level 1 to start a new cycle |
30 |
ASK BM |
2 min |
|
14065 |
Battery overvoltage level |
34.1 |
ASK BM |
26.8Vdc |
|
14066 |
Restart voltage level after a battery overvoltage |
32.4 |
ASK BM |
26,5Vdc |
Lithium batteries have some characteristics that you must take into account when designing Off-grid installations to avoid problems. Some installers have experienced problems during commissioning and, in most cases, the only solution has been to increase the battery capacity at the high cost that this represents. Please read this document carefully to avoid such problems.

1. pre-charge of internal capacitors
In order to keep solid and robust devices, Studer inverters/solar chargers have large internal capacitors. During startup, these capacitors demand a high charging current (Over 1000 A) from the battery for a very short time, just few milliseconds. Lead-acid batteries can handle these spikes, so this has not been a problem with this old but reliable battery technology.
However, lithium battery modules may not handle these spikes by themselves and systems could not startup. To solve the issue it is necessary to increase the number of battery modules, so they share this inrush current.
For that reason, some lithium battery manufacturers have a “minimum configuration list”. Where they indicate, depending on the inverter model and number of units, what it is the minimum number of battery modules you must install for a proper functioning. Please check for the latest version of these documents.
Example: BYD BBox Pro 2.5. Detail of minimum modules in Off-Grid single-phase system

2. limited peaks current (pumps, motors..etc)
Other characteristics of lithium batteries are:
- Nominal charge current (A)
- Nominal discharge current (A)
- Peak discharge current per module (A)
Studer inverters use the highest quality. One of our unique features is that our devices can handle peaks up to 3 times its nominal power. Example: XTH 8000-48; Nominal power: 7kVA & Peak power (5s): 21kVA. This is especially important in industrial applications, where pumps, fridges and motors can be found. The benefit of this feature is to avoid unnecessarily oversizing the inverter.
In order to take advantage of the full potential of our system, you need to select a lithium battery that can deliver the peak current the load is demanding.
Example: In an industrial application there are 2 x 3kVA pumps. The peak demanded by these 2 pumps is 20kVA and they will be working up to 2h per day. We select inverter/charger XTH8000-48 (Nominal power: 7kVA; Peak power: 21kVA).Now you have to choose between these 2 battery models. What configuration would give a good performance.
|
|
Capacity kWh |
Nom. Charge Current |
Nom. Discharge Current |
Max. Discharge current per module |
|
Battery A |
5kWh |
110A |
110A |
200A |
|
Battery B |
15kWh |
216A |
216A |
375A |
Solution: daily energy needed: 6kVA x 2h = 12kWh. If we decide to discharge the battery up to 20%SOC. Then battery capacity should be at least 15kWh.
1 x “Battery B” seems to be the easy choice as its capacity is 15kWh. But what about peak current? These pumps could demand up to 20kVA during startup. Can 1 x “Battery B” supply this current? Unfortunately, No (Peak current = 20kVA/48Vdc = 416Adc). This battery could protect itself due to the high current demand.
In this case the right option is 3 x “Battery A”. You have 15kWh (3 x 5kWh) energy available and can handle up to 600A peak power (3 x 200A) . Other option is add 2 x “Battery B”. Not recommended.
3. low temperatures: reduced charging current
When we talk about a lithium battery with communication, the BMS controls/defines the maximum charge current. When the battery temperature is below 10-15ºC (depending on the manufacturer), the BMS will reduce the charging current significantly (Example: 0.2C). And if the temperature falls below 0ºC, it will forbid the charge of the battery.
This entails that someone who is trying to charge a battery with a generator, through an Xtender (Studer Inverter / Charger) could have the generator working for hours without almost charging the battery. Or that on a sunny day, the Variotrack (Studer MPPT Charge Controller) won't produce as much as it could. Due in both cases to the limitations of the BMS.
What is the correct approach to avoid this problem? The simple thing is to place the battery in a room that ensures a minimum temperature of 15ºC in the cold months of the year.
What happens, that this solution in an installation in the middle of the mountain, is not something that can be assured, especially when we talk about mountain shelters or very cold places. For this reason, alternative solutions must be sought, such as thermal resistances, which ensures that at the moment of charging, the temperature of the battery rises in order to make the most of the charging current.
A 3-phase system can be created by combining 3 xtender inverter/chargers. You can use different models in each phase as long as they use the same battery voltage. Because the battery bank is common to all of them.
Examples:
|
L1 |
L2 |
L3 |
CORRECT? |
|
XTM 2400 – 24 |
XTM 2400 – 24 |
XTM 2400 - 24 |
YES |
|
XTM 2400 - 24 |
XTM 3500 - 24 |
XTH 5000 - 24 |
YES |
|
XTM 2400 – 24 |
XTM 4000- 48 |
XTH 3000 - 12 |
NO |
Step 1: Electrical Diagram

Step 2: Communication Wiring
All Xtender family systems must be communicated trough the Studer bus to synchronize and share information. In this particular case, it is also needed to manage phase shift between the different inverters.

Step 3 : Phase Selection Jumpers
Adjust phase selection jumper in each xtender (images below XTH, XTM and XTS):
• xtender 1: Jumper in L1
• xtender 2: L2 (L2 with 120 degrees phaseshift)
• xtender 3: L3 (L3 with 240 degrees phaseshift)


The order of the devices is very important in the Studer communication bus for a good performance of the system.
Inverters and solar chargers are powered by batteries. Accessories, instead, are powered by the bus cable. Bus cable is formed by 8x wires, and 4 of these wires carry power provided by xtender, variotrack or variostring devices to accessories.
If you connect an accessory between, for example, 2x xtender, both devices are going to power the accessory, and this could make to malfunction it.
So, it is important to not connect an accessory between 2 inverters/solar chargers!

Please, follow these rules:
1. No accessories between Xtender, VarioTrack or VarioString.
2. Xcom-LAN/GSM must be connected at the end of the bus and directly to a Xtender/Variotrack/VarioString. Try to avoid connect any accessory in between, because Xcom-LAN/GSM require more power due to modem.
3. BSP is an exception. It is the only accessory powered from batteries. Anyway it is recommended to connect it at the end of the bus.
4. If Xtender, VarioTrack or VarioString fails, they will not power anymore accessories in its side of the bus and therefore these accessories will be disconnected from the system.
5. Each device has two RJ45 connectors, you can connect the cables to any of them.


Example of good connections:


End Bus Switch
All Xtender devices have an End Bus Switch. This switch must be set up properly depending on location of each device in Studer bus. The devices at the end of the bus must have this switch in T position. See below where is located the switch in XTM and XTH, as example.


To confirm that all the devices are properly connected and communicating. Please go to System Info screen in RCC and check System Info Summary. If there is some device missing, it means that there is some problem in communication bus or the device could be not powered (See images below).
Important:
Be aware that under RCC label could list any of these accessories: RCC-02, RCC-03, Xcom-LAN or Xcom-GSM. In the same way, under BSP label could list BSP-500, BSP-1200 or XCOM-CAN when configures to communicate with lithium batteries.
When you develop a project that is going to have many identical installations. You need to create a Masterfile to work smarter.
Step 1: Set up the first system
You need to configure the first system manually (RCC). This system will be the template. Run all the possible tests to make sure the system works as expected. Now you need to create a Masterfile.
Step 2: System Back Up (Including Masterfile)
By default, the system stores a daily log file on the SD card of the RCC and/or Xcom device. However, in order to have a complete system backup, including the log files, the current configuration parameters and the system messages, the function "Save all files (system backup)" should be activated. Please go to RCC settings and follow the next steps:

Please bear in mind that this function could take up to 15 minutes in a system with 9 Xtenders.
Once the backup is finished, please take out the SD card from the RCC-02 console. Then you can copy all the files and folders in the SD card using a computer.
Please re-insert the SD card in the RCC-02 console when the process is finalized.
Step 3: Copy Masterfile to other systems

Please bear in mind that this function could take up to 15 minutes in a system with 9 Xtenders.
Step 4: Verify configuration
Select a parameter that should have been modified in this process. Enter in RCC, locate this parameter and check value. In case parameter value is not correct, repeat Step 2.
When you add a new unit to a multi-unit system or when a repaired unit is back. You must be aware that they could have a different SW version and a different configuration.
In order to avoid conflicts, before starting the system you must follow this procedure:
Save all files from the old units to the SD card when disconnected from the new one (RCC settings/save and restore/save all files {5041}).

1. Adjust physically:
a. Electrical Wiring: communication cables in Studer Bus. It is very important the position (XT, VT and VS in the middle and accessories at the ends of the bus).

b. Termination bus switch. In case inverter is at the end of the communication bus this switch must be adjusted in “T” position. If not it should be adjusted in “O” position (Images below show switch location).


c. Phase Selection jumper. Indicate to new inverter in which phase will be located with this jumper. Adjust in L1, L2 or L3 (Images below show jumper location)
3. Update the software to the latest version.
4. Apply configuration files (RCC settings/save and restore/apply configuration files (Masterfile) {5070}) that have been created on SD card during point 1.

5. Start the system
In the RCC you see only the settings from the master, not from all units, so it is always better to apply using the master file in order all the units have the same configuration.
Studer devices provide a great flexibility for adapting your solution to any type of application. Use our Configuration Assistant to set up your system in a couple of minutes. Afterwards, you could configure the advanced functions if required using the settings menu.
Check our Youtube channel where we have an explanatory video of how to use the configuration assistant:

The Configuration Assistant will be the first screen that you will see in your remote control (RCC-02/03) when connecting your system. The configuration assistant will guide you through the basic configuration of the system. Please make sure that you have the main system information with you, especially battery and AC source.

Are you prepared? Let's have a look at the process:

Start by setting the language and time:


You can choose between the following battery types:

Choose “Specific battery” if you have the battery charge cycle parameters from the battery manufacturer. We recommend to contact your battery supplier for providing this information.
Introduce the battery capacity in Ah, from 20 to 20000Ah according to C20 discharge rate for solar applications.

In case you have a generator choose between single phase or three phase generator and introduce the nominal power of the generator:
· 200 – 32000 W for single phase generator
· 1 – 100 kW for three phase generator
Adjuste the nominal power according to the altitude. Check with your generator provider. You can reduce 10% per every 1000m above the sea level.

If you have the grid as AC input source, then you can use the current rated in your grid connection protection device, usually a circuit breaker (MCB), in the range of 0 to 250 Aac.


After these three steps, the configuration assistant will be ready to apply the configuration to your system. The RCC will guide you through the process, indicating the progress and showing a confirmation message when the process is finalized.

The configuration assistant will be available in the RCC main menu for repeating the process if required. For advanced configuration, the settings menu are also available in the RCC menu. In the FAQ section we have described how to configure some of the Xtender functions, such as self-consumption, AC-coupling, automatic start of generator, etc.
The configuration assistant will be available in the RCC main menu for repeating the process if required. For advanced configuration, the settings menu are also available in the RCC menu. In the FAQ section we have described how to configure some of the Xtender functions, such as self-consumption, AC-coupling, automatic start of generator, etc.
There are many different SD card types and manufacturers. We use HC SD cards in order to be sure of the compatibility with our devices:

If you have received a message on your RCC stating that your SD card is corrupted, please follow the recommended procedure below.

1) Update the system software
Since software version R682 the system is able to format automatically SD Card of your Xcom-LAN/GSM and RCC in case issue will appear
2) Format the SD card
Format the SD card using the formatting tool available in Windows or Apple OS. Make sure that you choose either FAT or FAT32 as file system.
The easiest way to format an SD card in Windows is as follows:
1. Open Windows Explorer.
2. Find the drive for your SD card.
3. Right-click, and when the menu appears click Format.
You can give the formatted drive a name by entering it into the Volume Label.
Finally, click on the Start button.
A warning will appear notifying you that all data on the drive will be erased.
Click OK to continue.
At this point, your drive should be formatted correctly.
3) Format the SD card remotely using the Studer Web Portal
In case you don't have access to your installation, it is possible to format the SD card in the Studer Portal remotely. Please contact our Support Team or your local distributor.
Messages for troubleshooting on RCC
Did you know that a list of more than 220 messages accompanied by a troubleshoot description are available in our product manuals?
For instance, in our demo installation we received the following message (170):

Looking into the RCC Quickguide or the VarioString Manual we are able to identify the following information:


Please check our products manuals and the RCC quickguide for further information.

Did you know that a list of more than 220 messages accompanied by a troubleshoot description are available in our product manuals?
For instance, in our demo installation we received the following message (170):
Looking into the RCC Quickguide or the VarioString Manual we are able to identify the following information:
Please check our products manuals and the RCC quickguide for further information.
Our development team has worked incessantly to turn the BSP into the central brain of our Xtender system. We have improved the robustness of the central battery charge current control. When activated, the BSP manages the global battery charge current, measured directly by the BSP in the battery, and controls the VarioString, Variotrack and Xtender charge currents. This control will implicitly apply a solar priority strategy. Thus, the current will be taken primarily from the Variotrack and VarioString.

Configure the centralized charge current control with the BSP:
|
Device |
Xtender settings |
N° |
Description |
Value |
|
BSP |
Advance settings |
6058 |
Battery current limitation activated |
Yes |
|
BSP |
Advance settings |
6059 |
Max battery charge current |
150 A* |
* Studer recommends contacting your battery manufacturer in order to confirm your specific battery's maximum charge current. The most commonly used value for battery charge current is 10-20% of the battery total capacity, prior to confirmation with the battery manufacturer.
The Xtender can be operated with any earthing system. In all cases it is imperative that the protective earth is connected in compliance with the applicable standards and regulations. The information, notes, recommendations and diagrams mentioned in the manuals are always subject to local installation regulations. The installer is responsible for the conformity of the installation with the applicable local standards.
The Xtender has a different role when there is an AC source connected or when operating off-grid.
In case the Xtender is connected to a source (generator, grid), the Xtender synchronizes with the AC input and closes the transfer relay. The Xtender is just a bridge from AC-input to AC-output. In this case, the earthing strategy from the source is then transferred to the output and there is no need to configure anything in the Xtender.
When off-grid, the Xtender is forming the grid with energy from the battery, using the inverter function. In this case the Xtender is the source and we should configure the earth according to the desired strategy.
In most applications, the source should have the neutral connected to the ground, especially if there are residual current circuit breakers (RCCB) installed. There are two options for configuring the neutral to the ground in the Xtender:
· Xtender ground relay {1485}
By allowing the ground relay, the Xtender will automatically connect the neutral to earth in the AC-output, when the Xtender is off-grid in the inverter function.

This relay is automatically open (no more liaison between neutral and the earth within the Xtender) when the Xtender is connected to a source. The earth strategy is coming from AC-in, from the grid or generator.
· Continuos neutral from AC-in to AC-out {1486}
For stationary applications, we can configure the Xtender to tie the AC-in neutral with the AC-out neutral. There is an AC-in continuous reference (grid or generator) and the neutral is always transferred to the AC-output. In this configuration, the transfer relay will open only the AC-input phase, leaving the neutral connected, when the Xtender is on inverter function.

Both strategies are not compatible to be configured simultaneously, the installer should choose one. We recommend configuring the ground relay {1485} for most applications and continuous neutral {1486} for stationary applications. If none of these strategies is configured, the installation will not have the neutral referenced to the ground when the Xtender is off-grid. This could lead to a not proper functioning of the RCCB devices in the installation.
Studer Innotec SA is an equipment manufacturer, not an installer, integrator or electrical specialist. Please check the local regulations and contact with a specialist on the field for an assessment.
Similar to AC, we recommend contacting a specialist for an assessment on DC earthing: battery and/or PV solar generator.
There are the following standardized earthing schemes, according to the Electrical Installation Wiki, depending on the earthing strategy in the source and in the exposed protective parts:
|
TT · Source neutral = T · Exposed conductive = T T = Terra (latin), earth |
|
|
TN-C · Source = T · Exposed conductive = N Neutral is protective conductor (C) |
|
|
TN-S · Source = T · Exposed conductive = N Protective conductor and neutral separate (S) |
|
|
IT · Source = I · Exposed conductive = T No connection between neutral and earth in the source |
|


The dimensioning of the solar generator is crucial for having enough energy to charge the battery and supply energy to the loads. The configuration of the solar array must be done according to the voltage and current limits of the solar regulator, in this FAQ we consider as example the VarioTrack (VT).
To get the optimum solar voltage the PV modules should be connected in series to form a string with the desired voltage. The optimum operating voltage of the string (Vmpp) should always be above the battery voltage. The maximum operating voltage must always be lower than 145Vdc, under any temperature and irradiation condition. This value should be calculated according to the modules open circuit voltage with the temperature correction for the lowest temperature expected for the installation.
For example, if we are working with a 60 cells PV module with the following characteristics:
· Open circuit voltage, Voc = 39,1Vdc (at STC, 25°C)
· Thermal coefficient for Voc, βVoc = -0.33 %/°C
For this module the open circuit voltage at -10°C (lowest temperature of your installation) will increase by 11.55% up to 43.61dc. Therefore, it is possible to install up to 3 of these modules in series for this installation, in order to respect the maximum of 145Vdc of the VT-80.
Thus, we have a maximum of 3 standard modules (60 cells) per string in our typical configuration for 24 and 48V batteries.

Possible arrangement in series for common PV panels according to the number of cells and type
The voltage calculation is critical, as a potential voltage above 145V will damage the device and may cause fatal defects in the installation.
In terms of power, several strings are usually connected in parallel. Each string connected in parallel should be composed of the same number of modules of the same type. The number of strings connected in parallel will determine the solar charging current. The VT has a current limit: 65 Amps for VT-65 and 80 Amps for VT-80. This will be the maximum current that the VT is able to take from the solar array towards the battery. If the number of strings in parallel is increased, the VT will reach its maximum charging current quicker and even when solar irradiation is lower. This will also mean that there would be a bigger potential of energy that will not be used when the solar irradiation is high.

As soon as the voltage limit is respected, the solar power to be installed depends on the dimensioning of the installation. Thus, it is possible to oversize the solar power to maximize the solar production, even if this means an increase of potential solar energy not used.

In terms of irradiance this could be relevant, for example in European countries, during most of the year the solar production is lower than the nominal power because of low irradiation (winter, clouds, etc.). If we take the example of our factory in Switzerland, we could have a 10% over dimensioning in solar power, which will represent a very little excess of solar (solar not used) during summer, but a 10% increase in the production all over the rest of the year:

In addition, there are other weather and context conditions that could drastically influence your solar production and that you should consider (such us dust, air particles, pollution, snow, shadows, etc.). For example, in countries where there is snow during the winter, the dimensioning should consider the reflexion (albedo) can be quite high and the irradiance on the solar modules can be higher than the standard test value of 1000W/m2, influencing the Voc and Isc values of the modules in winter.
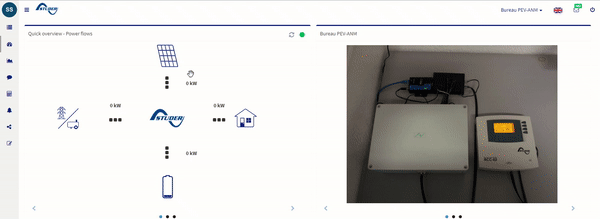
The Studer Web Service facilitate easily to integrate the data from your Xtender installation in your web-based platform. This is possible through a RESTful based API (Application Programming Interface). More info about REST in this article by Wikipedia.
To communicate the installation to Studer server, it is necessary one of these 2 accessories: Xcom-LAN or Xcom-GSM.

The Studer Web API is available with the following 4 functions:

And it is structured in the following way:
/installation - Data related to an installation (synoptic, parameters, etc)
/datalog - Related to datalog portal features
/message - Consulting messages
/image - Managing installation’s pictures
When you access to Studer API https://api.studer-innotec.com/swagger/ui/index, it will show you these 4 submenus and an index with its operation list available (See image below).

When you click in a particular operation, it will expand and show its structure
Example:

Independently of the operation you want to perform, you need to supply at least 2 parameters: Email address and password to get access. These values must be encoded for security reasons.
- Password must be encoded in MD5
- Email address must be encoded in SHA256
You can use this tool for this task:
https://emn178.github.io/online-tools/md5.html (To encode in MD5)
https://emn178.github.io/online-tools/sha256.html (To encode in THS256)
Note: PHASH and UHASH parameters are special because they must be passed in Header’s request.
A useful tool to test, it is a third party SW called Postman.
https://www.postman.com/downloads/
In a hybrid system is very important to have an automatic management of the backup generator, according to different conditions. The main goal of the backup generator is to protect the battery from deep discharge. At Studer we know that the protection of the battery is critical, therefore we have preconfigured the automatic start of a generator according to battery voltage using the Xtender's Auxiliary Contact 1 as factory settings. You only need to cable the Xtender's Auxiliary Contact 1 and the generators' automatic start. The preconfigured factory settings will do the rest, starting your generator when the battery voltage is low. When your battery is charged, the Auxiliary Contact 1 will be deactivated and your generator will turn off automatically.

Your Xtender system is prepared from the factory for an easy integration of a backup generator to protect your battery. The battery voltage conditions are preconfigured by us. We recommend adjusting the battery voltage values according to your system design and the battery manufacturer recommendations. Configuring the Xtender to automatically start the generator according to other conditions and events is also possible in the Xtender settings menu. Most generators have an automatic start available. If you have a generator with a three-wire contact, you can still configure the system for an automatic start of generator, using the extended functions of the Auxiliary Contacts 1 and 2.
Here you can follow the video:
You can follow the video for finding your GUID (Xcom-LAN/Xcom-GSM/Xcom-4G)

The expert code is 426468 and you can insert into the RCC's menu:
You can share your installation with us: support@studer-innotec.com
next

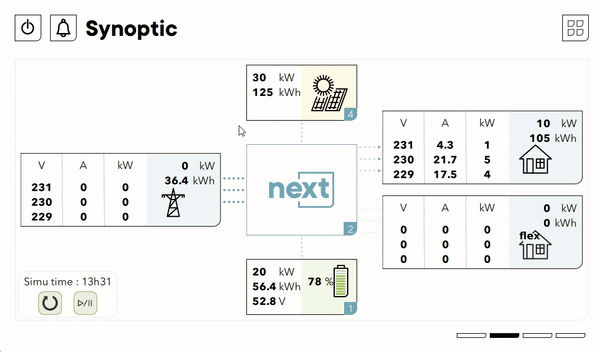
Yes it's possible to perform the AC-Coupling (adding an ongrid inverter in the AC-Load or AC-Flex of the inverter)
By default, the system is designed to protect the battery, allowing it to last long-term without requiring a full charge. For this reason the next3 will prevent you from discharging your battery in an ongrid situation. This function is called SOC for backup adaptive and can be deactivated
In this case, you either need to turn on your generator, connect to the grid, or wait for your PV to recharge your battery.
Check on the notification center which kind of error message the system is sending: please be sure you're running the latest version, some improvements might have already been fixed
No, the next3 and next1, by design, do not require a smart meter, as all electricity passes through the device.
No, the next3 and next1, by design, do not require a smart meter, as all electricity passes through the device.
Yes, the next3 and next1 models are designed to operate off-grid using the battery.
No, the next3 and next1 require a battery to operate.
AC flex, a second source, or an extra controlled load.
Opening up a whole range of possibilities with the AC flex input/output of our inverter-charger, which can be programmed as a current input (to connect to a voltage source such as the grid or a genset) or as an output (the voltage is supplied to this connection). The AC flex measures and records all the power flows that goes through it.
Some options example:
AC coupling: When configured as an output, the AC flex allows the next1 to work together with a standard solar grid inverter. This can be very interesting for retrofitting existing installations with batteries. The AC current from your existing inverter flows into the AC flex, which charges batteries and powers loads.
Load shedding: The AC flex can be programmed to cut power supply in certain conditions (such as a blackout, or low battery levels, etc.) to conserve energy for essential appliances, ensuring uninterrupted power to critical loads. It can also be programmed to be activated according to certain conditions, which is useful for powering your loads based on your production.
Genset: A diesel generator can be connected to this input to supply power. The next can start it automatically according to the conditions you have set.
Hydro + wind power: As a sustainable alternative to diesel, a hydraulic or mini wind turbine can be connected to the AC flex to generate carbon-neutral electricity, either in AC-coupling or as a voltage source.
EV charger: Connect your EV charger to the AC flex port and know exactly what is consumed by your car, disconnect it in case of blackout or other different conditions (for example, if there is no solar and the battery drops below 50%).
Vehicle to Load (V2L): This technology enables your vehicle to function as MobilePowerStations, providing electricity to power external devices and equipment. It has a wide range of potential applications, from powering tools and appliances on a worksite to providing emergency power during a blackout. To enable this feature, vehicles must have compatible hardware and software. This voltage source provided by the car can be connected to the AC flex and be an emergency voltage source.
And more...
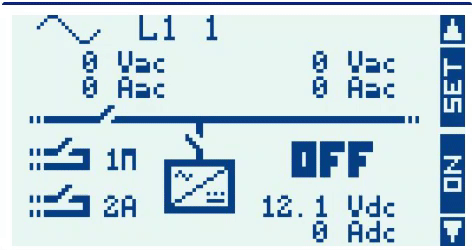
The next3 can be configured for two types of neutral/earth connections:
- Offgrid Self-Managed: (default value) in this situation, when off-grid, the next3 will make a bridge between earth-neutral of AC-Load and AC-Flex if configured as output
- Solid neutral: in this case the device will take as neutral reference the one on AC-Source (input). A bridge will never take place and you must make a bridge between neutral-neutral-neutral of your AC-Source, AC-Load and AC-Flex respectively.
Please note, follow your local rule.
When a generator is connected, a bridge N-PE is required.
You can change by following this video:

You can turn on the AC flex by following this video:
You can allow by following this video:
You disable grid-feeding by following this video:
You can restart it by following this video:
You can find it by following this video:
You can allow by following this video: